Wednesday, September 29, 2010

Whiney Goes Sober!

Our next challenge was to help Whiney pass the sobriety test. Our original line following program did help Whiney follow a line, however Whiney didn't walk straight or smoothly but he followed a rather crooked path along the line.

For this challenge, Whiney had to smoothly follow this path.
 This challenge was a lengthy process. We had many versions of how to do this and many of them failed in some way or the other, but we tried to learn from our mistakes and we finally created a program that worked...(for the most part).

We started by writing simple stacks that defined for Whiney how to turn.
We implemented these turn blocks through out the code we wrote for this new line following program telling Whiney at which circumstances to go straight, turn right, or turn left. Professor Berg suggested a model to help our robots walk in a smoother, straighter line. Using his method, we implemented the turn counters in the wheels to count how many times each motor/wheel is turning. If a robot is going completely straight, each of its motors (left and right) should turn exactly the same number of times for a given time period or distance. However, due to effects of the physical world (friction of the wheel, something caught in the motor etc) sometimes one motor turns more than the other. Thus, as in our own driving, the robot starts to drift to one side instead of going straight.
When we are driving, we use our eyes to notice that we are drifting and we correct this behavior by adjusting our wheels to turn towards the direction opposite of our drift. For this challenge, we want to write a program that does a similar auto-correction when the robot is drifting. To accomplish this we used the counters to compare how many times each motor had turned. Our program told Whiney to constantly continue checking if one motor had turned more than the other and if so, Whiney would turn the opposite way of the motor that had turned more. Since the program is constantly checking to see if one counter is greater than the other, Whine would not be making these turns for long because as soon as this other counter turned more than the original one, Whiney would turn back the other way. The computer performs this code so fast that Whiney is forced to walk in a straight line.
The challenge, however, is not yet complete. We have accomplished the task of Whiney going straighter, but we still have to make him follow a straight line. To do this, we implemented the ideas from our original line following program. However we included the code from this program in "if, then, else" statements instead of "wait until" statements. Thus, the code would constantly be going through all the "if" statements in the loop constantly, instead of slowing down and pausing to perform one step.
The challenge here was in how we placed these if then statements and how we set them up. Ultimately we created three versions of the Sobriety Test code. One of which worked much better than the others.
Version 1 - Winner


 This is the version of our sobriety test that worked the best. Here we have arranged the if statements so that the program checks for 3 different conditions in two "if" statements. The first "if" statement can be excecuted if either one of it's two conditions are satisfied. If count a [counter for the left motor] is greater than count b [counter for the right motor] then the robot is drifting to the right in which case the robot should auto-correct and turn left. If sensor3 [the value of left sensor] is greater than 700, then the robot sees the black line with it's left sensor thus the robot should turn to the left so that it is straddling the line. Since these conditions warrant the same reaction, we grouped them into a single "if" statement using the "or" operator. This "if" statement will cause the robot to turn left if either of these are true. The second "if" statement checks to see whether sensor 1 [the right sensor] has seen the black line or not, because if this is the case we want the robot to turn right. This program correctly checks for all the conditions, keeping Whiney's driving straight and smooth and also following a path guided by a black line.
The problem with this version however is that Whiney cannot fully make all turns. We could only start the Whiney from one side of the course because starting from the straighter side, Whiney could not make the last, wider angled turn. To account for this, we tried making two more versions of the sobriety test, this time implementing "wait until" statements.

Version 2 & 3 - SobFail & SobFail2


These two programs were essentially the same as the original sobriety program but this time the "if" statements are split up and we have now added "wait until" statements to two of the "if" statements. We added these "wait until" statements to allow Whiney to make more of a variety of turns, such as the large turn at the end of the track our challenge was based on. These "wait until" statements were added to elongate Whiney's turns so that at any given moment, if one of Whiney's sensors saw the black line, Whiney would turn the opposite way [of the way it had just been turning] and keep turning until that same sensor was off the black line. SobFail then tells Whiney to turn the opposite way of the turn it just made, while SobFail2 tells Whiney to now continue with the "forever-loop" to continue checking the other "if" statements. SobFail didn't work because we reealized we were wrong to make Whiney turn back in the same direction it had turned away from immediately after the sensor was once again off the line. SobFail2, on the other hand, was tempramental. When we first tested SobFail2, it had seemed to work, including the last turn and everything! The problem with it was that the path it had taken along the black line was no longer as smooth as we had in our original sobriety test. Whiney had returned to his original habit of zigzagging.
[Perhaps Whiney had reverted back to his addiction of alchohol?]
After we went back to try and fix this zigzagging error by increasing Whiney's speed, we tested SobFail2 again. However, this time, Whiney no longer followed the program correctly. Not only did Whiney still zig-zag, but he also did not complete the last turn. After changing back the speed to it's original value, we tested Whiney again. ALAS!! It seems that Whiney had gotten tired of going along that path time after time trying to please us. Whiney refused to work again! We tried this a few more times before giving up and reverting back to our original Sobriety Test which, ultimately, regardless of it's glitches [i.e. inability to make all turns], worked the best.

Whiney Sees The Light!!

Whiney now has eyes!!

For Whiney's next adventure, we were challenged to create a program that made Whiney hone in on a light source and then go towards it wherever the light goes. For this challenge, we essentially did the same thing we did to make the line following program. However, we ran into some different problems this time. One of our major difficulties was to account for the discrepancy between the two sensors and how they registered the same amount of light. However, we easily accounted for this difference by setting a variable n to be the approximate difference between the values of the two sensors when they were facing the same amount of light (approx. 125), plus the value of the sensor that gave the smaller value (sensor 3). Thus n = 125 + sensor 3. We used this number n throughout the code in place of sensor 3.

Upon testing the program, we learned that we also had a slight problem with the physical aspect of the robot and the placing of our sensors. In order for our robot to correctly follow our program the way we wanted it to, the sensors must not overlap in the amount of light they see. In other words, the angles through which the sensor can sense light must not overlap or both sensors will be reading most of the same amount of light at the same time when our program relies on the fact that at any particular time unless the robot is pointing straight at the light, one of the sensors will sense the light more than the other depending on how the robot is turned towards the light. In order for us to account for this physical discrepancy, we had to create blinders around our robots light sensors. We used simple flaps of duct tape on the sides of the sensors facing each other to create a blinder down the middle. After we had accounted for all of these things, Whiney correctly followed the light as if it were in love with the lamp. =]
Here's a video of our love-struck Whiney:


Whiney Follows A Line

For our next challenge we changed partners and started with new SciBorgs. My partners for this challenge and the few others to follow were Shirley Doan (read her blog here) and Sarah Hitchner (read her blog here).
Here I introduce Whiney, our beloved robot for these challenges.

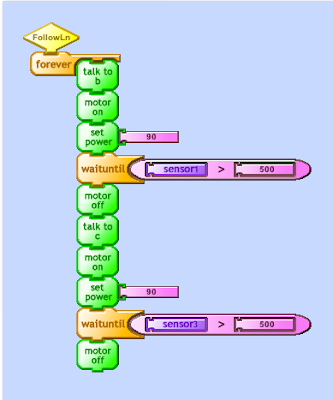
Our first challenge is to make Whiney follow a line. We used a simple algorithm to create this program. Whiney would turn until one way until the sensor on the side opposite the way he is turning sees the black line. Once this happens. Whiney turns the other way until his other sensor sees the black line. Though the algorithm seemed fairly simple, my group faced many problems along the way. For one, we discovered halfway through the class that one of our sensor ports on the robot was not working. We were trying, for a while, to figure out why our sensor barely detected a difference between black and white surfaces. We changed the resistors and still the error persisted and in fact got worse to the point where the sensor no longer detected any difference between the black and white sensors.
When we switched this sensor to another port, the sensor began working fine thus we inferred that sensor port 2 had malfunctioned. After overcoming this difficulty and other minor coding difficulties, we got Whiney to run a beautiful line following program as shown below.
Our Line Following Program

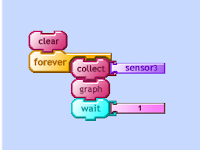
The code we used to test our "blackness" thresholds for each sensor

After running this program, Whiney was correctly able to follow a line.


Sunday, September 26, 2010

SciBorgs

After modifying our kinetic sculptures, we moved on to a bit more complex robots. We started working on SciBorgs using essentially the same programming language (PicoBlocks) but on more mobile robots rather than stationary sculptures.
Challenge 1 - Back Up:
We used the bumper sensor on our Sciborg to create a program that told the robot to go straight until it hit something and then back up for one second.

Challenge 2 - Escape:
The second challenge was to create a program that would allow our SciBorg escape from the middle of a bunch of obstacles. We implemented the code from our first challenge and added a turn after the SciBorg backs up. And then it continues to go straight. Then it waits for the SciBorg to bump into something again and it runs the whole program again.
Ignore the [reset countb] block, we had accidentally left
that in there from something we were trying earlier...
Challenge 3 - Go The Distance:
[Like the song from Hercules!!!] <----click ^-^
The third challenge was to make our SciBorgs travel in a straight line a certain distance (1.5 meters), and then come to a stop. We accomplished this in three different methods.
----Method 1 - Counter-----
The first method we used to accomplish this task of going the distance was implementing the wheel counters. The LEGO motors have built-in counters that keep track of how many times the wheel has turned. We used the data from these counters to tell the robot to stop after one of its wheels had turned a certain number of times. To figure out how many times the wheel would have to turn to go 1.5 meters, we made intelligent guesses and checks to figure out that it would have to turn about 1500 times.

-----Method 2 - Timer-------
The second method we used was implementing the timer. We estimated how much time it would take to go 1.5 meters in a straight line, and wrote our program accordingly. Guessing and checking led us to the time we used: 40 seconds to go 1.5 meters.
------Method 3 - Detecting the Finish Line-------
The third and perhaps the best method we used implemented the light sensor on our robot. We used this light sensor to differentiate between the dark gray floor and white electrical tape. We set two pieces of tape, one black and the other white, 1.5 meters apart. The robot is placed at the black tape and is programmed to go straight until the sensor sees the white tape (the finish line!!).


Here are the yellow blocks we created and used throughout the programs:


Tuesday, September 14, 2010

Kinetic Sculpture - (part 2) Level Triggered Logic

For this second part of this project, we had to redesign our robots using Level Triggered Logic. Thus, Alexa and I redesigned our kinetic sculpture to dance while the music is playing and stop when the music stops. To accomplish this, we programmed our code to check to see if the music had stopped playing after every sequence of steps.


The Code: Our Kinetic Sculpture functions on running these two stacks simultaneously.


The stack of code defining our block "Stack2"
The Music
The Dance Moves: A set of our own blocks defining the dance moves used in "Stack2"

Thursday, September 9, 2010

First Project: Kinetic Sculpture

Our first project was to design a kinetic sculpture using the Pico Cricket program. My partner Alexa and I designed a sculpture that I like to call dancing couple. The suclpture is a rotating device with a lego couple on it that is activated by a sound. The sound that activates it is the programmed sound from the speaker that attatches to the cricket. When the codes are run simultaneously, music starts playing and the sculpture starts rotating as if a couple was dancing to the music.


Hello World!!

Hello World! This is my first blog which will mainly be used for my Robotics Design Studio (RDS) projects, but perhaps in the future I will post some other fun projects and stories.